 |
| BushcraftZ 2013 |
Advent is a season upheld by Christians in preparation of
Christmas, a celebration of the coming of Jesus Christ. This spiritual
preparation starts the fourth Sunday before Christmas and ends the first Sunday
before Christmas.
One of the traditions during Advent, started by German
Lutherans, is the Advent calendar. In general it is a countdown of the 24 days
in December preceding Christmas, there are however variation on this theme. The
first recodred Advent calendar dates from 1851 and in 1902 the
first Advent calendar was printed.
Traditionally this calendar consists of two
cardboard sheets placed on top of each other. The top sheet has 24 doors. One
door is opened each day and behind each door a spiritual picture is revealed. The
last or 24th door sometimes hid a special treat marking Christmas eve. Modern Advent calendars have become a more
secular countdown towards Christmas and are often geared at children taking
various shapes and forms where each day hides a special treat.
In today’s hectic world the miracle of Christmas is often
lost while trying to keep up with our responsibilities. A time for quiet
reflection and connecting with family is often pushed aside.
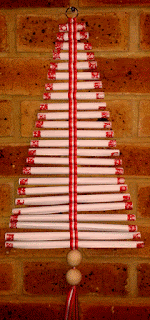
I have designed a simple advent calendar for adults. Each
day is represented by a scroll that can be opened and the note revealed. What
you put in each scroll is up to you. I have included a mix of fun family
activities, inspiring verses, bible verses and small vouchers, such as an
invitation for a cup of tea or coffee at a favourite coffee shop. It makes a great gift for your partner,
friends, parents and grandparents or just for your own family.
Materials:
- 24 x A 4 sheets of typing paper
- Washi tape and sticky tape
- 2 m ribbon of your choice. Needle and matching thread
- 2 large wood beads and a ring (key ring or any other ring)
- Large drinking straw, paper scissors, Craft knife, ruler and cutting mat
Method:
- Place the fist A 4 sheet in landscape format in front of you. Measure the width to be 28 cm and cut away the excess paper in order to obtain a 26cm x 28cm sheet of paper.
- Cut the remaining 23 sheets so that the width of each sheet is 1 cm shorter than the previous sheet ending up with a sheet of 26cm x 5cm.
- Stack the paper from largest to smallest. The smallest sheet
represents December 1st and the largest sheet December 24th.
Write notes, verses, vouchers and activities on each sheet of paper. TIP: Have the kids draw pictures for their grandparents and
write a note.

BushcraftZ 2013 - Use the straw as a guide for the size of each scroll and roll op all 24 sheets. Secure the sheet in the middle with sticky tape and at each end with coloured Washi tape. Place the scrolls in sequence from small to large to form a tree.
- Fold the ribbon in half. Thread the ring and use needle and thread to secure the ring at the fold.
- Place the smallest scroll between the two pieces of ribbon
directly underneath the ring and secure the ribbon below the scroll with a few
stitches. Continue adding scroll from small to large securing each scroll as
you work. The Advent calendar should take on the shape of a Christmas tree.

BushcraftZ 2013 - Thread the two large beads onto the ribbon to finish the
tree off.

BushcraftZ 2013 - Hang the advent calendar, ready to be opened each day from 1st to 24th December.
No comments:
Post a Comment